Testequipment
- Environmental testing equipment
- Special environmental detection equipment
- Mechanical testing equipment
- Large scale testing equipment
- Industry testing equipment
- Comprehensive testing equipment

Main functions of the device:
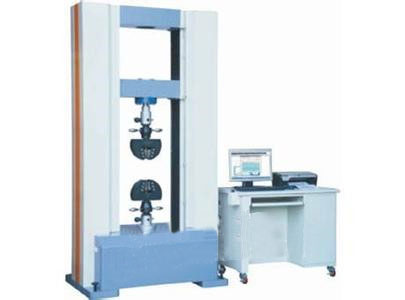
The Tensile testing machine adopts fully computer-controlled technology and is widely used for testing, analyzing, and researching the mechanical properties of non-metallic materials such as rubber, plastic, wires and cables, textiles, waterproof materials, non-woven fabrics, as well as metal wires, metal foils, metal sheets, metal rods, and other materials;
By using different fixtures, various types of materials can be tested, such as shoe soles, tires, rubber hoses, tapes, plastic cloth, plastic sheets, metals, packaging films, acrylic, ERP, ABS, EVA, PV, etc. The tensile, compressive, tearing, bending, peeling, shear forces, etc. of finished products, semi-finished products or standard specimens can be measured;
Testing machine standard: GB/T 16491-2008 Electronic universal testing machine
GB/T 2611-2007 General Technical Requirements for Testing Machines
Performance indicators and system composition of tensile testing machine
Model GC-LL-10000N
Technical indicator 1. Maximum test force: 1000kg (10000N)
2. Accuracy level of testing machine: 0.5 level
3. Stretching space: Standard model 850 mm, raised model 1000 mm, optional customization for other specifications
(Maximum distance between fixture joints without pre installed fixtures, please refer to H1 in the structural dimension diagram on the last page for details)
4. Effective test width: Standard model 500 mm, other specifications can be customized
5. Sampling rate: 100Hz;
6. Test force measurement range: 0.2% -100% FS (level 1)/0.4% -100% FS (level 0.5)
7. Resolution of test force indication: 1/500000
8. Displacement indication resolution: 0.00004mm
9. Displacement indication error: within ± 0.25% of the indication
10. Displacement rate control range: 0.001-500mm/min
11. Displacement rate control accuracy: within ± 1.0% of the set value when the set value is<0.01mm/min, and within ± 0.2% of the set value when the set value is ≥ 0.01mm/min
12. Force rate control range: 0.01-10% FS/S
13. Accuracy of force rate control: within ± 1.0% of the set value
14. Deformation rate adjustment range: 0.02%~5% FS/S
15. Deformation rate control accuracy: within ± 1% of the set value
16. Constant force, constant deformation, constant displacement control range: 0.5%~100% FS
17. Constant force, constant deformation, constant displacement control accuracy: within ± 1.0% of the set value when the set value is less than 10% FS
When the set value is ≥ 10% FS, within ± 0.1% of the set value
18. Small deformation indication error: within ± 0.5% of the indication
19. Small deformation measurement range: 0.2%-100%FS
20. Small deformation resolution: 1/500000
21. Large deformation indication error: within ± 1% of the indication
22. Large deformation measurement range: 0-900mm
23. Large deformation resolution: 0.001mm
Host size
(Standard model) Approximately 793 * 553 * 2095 (including base)
W*D*H(mm)
weight
(Standard model) Approximately 252 kg
Appearance sky blue with ship gray
structure characteristics
Main structure crossbeam: 45 # mold steel ground and treated with electrostatic spraying;
Base: 2.0mm cold-rolled steel plate, CNC cut and folded, treated with electrostatic spraying;
Dust cover: 2.0mm cold-rolled steel plate CNC cutting and folding, electrostatic spraying treatment;
Adopting High-strength columns to fix the upper and lower crossbeams and working surface, forming a high-strength portal frame with excellent rigidity;
The driving mechanism adopts Panasonic AC servo system, with high response speed and ultra-low vibration, ensuring high efficiency, stable speed, adjustable width, and meeting high-precision speed requirements;
The transmission structure adopts precision timing belt and Taiwan Shangyin/Germany Rexroth pre pressed precision ball screw transmission, which is highly efficient, rigid, low deformation, and low-noise, greatly improving transmission efficiency and displacement accuracy;
The force measurement system adopts an AD converter with high speed, high precision, and no step continuous acquisition, combined with the American Shiquan Precision Tension Compression Load Element, to meet the requirements of high stability and high-precision force value acquisition;
Up to five different specifications of load cells can be matched to meet high-precision testing under different ranges;
The displacement measurement system adopts a high-speed circuit four quadrant to collect high line count photoelectric encoder signals, completely solving the impact of low-speed jitter or direction changes during testing, and increasing the displacement resolution of the testing machine by four times;
Deformation measurement system
(Optional) Optional:
Large deformation extensometer: using a clamp type automatic tracking measurement, imported high-precision photoelectric encoder, and a specially designed transmission mechanism to collect the deformation within the clamp gauge length, meeting the large-scale elongation measurement of high elastic materials such as rubber, plastic, and film;
Deformation measurement system
(Optional) Optional:
Small deformation extensometer: using strain type electronic extensometer, high precision, high response speed, suitable for measuring parameters such as elastic modulus and non proportional tensile strength of metals, composite materials, plastics, ceramics and other materials;
Choosing different specifications of gauge length and deformation can meet the measurement needs of different types and specifications of materials;
Manual operation box
Manual operation box: After online operation, it can move the crossbar up and down, as well as run, stop, reset, etc., without the need for computer operation. It is extremely convenient for clamping test specimens and calibration;
The system hardware adopts a high-speed A/D data processing card based on PHILIPS ARM architecture, coupled with a high-speed, high-precision, and non segmented continuous acquisition AD converter, to meet high-precision force and deformation measurement;
The communication interface uses USB 2.0 high-speed transmission;
Testing software 1, U21 Material testing software
2. High resolution, high precision, easy to operate, meeting the needs of high-precision laboratory testing, easily handling various material tests such as tension, compression, bending, shearing, tearing, and peeling!
Software functional features:
3. Auto reset: After receiving the test start command, the measurement system automatically resets to zero;
4. Deformation switching: When using an electronic extensometer to measure the yield strength of materials, the software will automatically recognize the material yield and provide multiple prompts to switch deformation modes;
5. Automatic return: Select the automatic return function, and after the test fracture, the crossbeam will automatically return to its initial position at high speed;
6. Testing process: The testing process, measurement, display, analysis, etc. are all completed by a PC;
7. Display mode: During testing, the curve is displayed in real-time and automatically enlarged to the optimal size as the test progresses;
Using a mouse can zoom in on the curve locally, making it easier for users to understand the performance at any stage of the testing process;
8. Result reproduction: The software structure is modularized, and the storage and processing of data are based on MS-ACCESS database, making it easy to connect with office software such as Microsoft Office; The experimental results can be accessed freely and the data curve can be reanalyzed;
9. Curve traversal: After the experiment is completed, the mouse can be used to find the force values and deformation data of each point on the test curve, making it convenient to obtain test data for various materials;
10. Result comparison: Multiple experimental characteristic curves can be overlaid, reproduced, enlarged, and presented in different colors to analyze and compare a group of samples;
11. Auto save: After the experiment is completed, the test data will be automatically saved;
12. Test report: The report can be printed directly or exported in formats such as PDF, Word, Excel, etc;
Stretching: maximum force, tensile strength, yield strength, non proportional tensile strength, elongation at break, elastic modulus, etc
Bending: maximum bending force, bending strength, bending deflection, elastic modulus, etc
Compression: maximum pressure, compressive strength, elastic modulus, etc
Peeling: maximum peeling force, average peeling force, minimum peeling force, maximum peeling strength, average peeling strength, minimum peeling strength, etc;
The test report can also be programmed and printed in the format requested by the user;
13. Limit protection: with dual protection of programmable and mechanical limit protection;
14. Overload protection: When the load exceeds the rated 3-5%, it will automatically stop and the overload protection value can be freely set;
15. Other protections: Over travel and over time protection can be set; Emergency stop:
16. Equipped with an emergency stop switch, used to cut off the power supply of the entire machine in emergency situations;
17. Support various types of tests such as stretching, compression, bending, shearing, tearing, peeling, etc; (Different testing fixtures need to be selected)
18. Multiple languages can be switched, eliminating language barriers;
Professional report analysis output
Report header, display items can be set arbitrarily;
The report result options can be selected according to actual testing needs;
The report can be printed directly, exported in PDF, Word, Excel and other formats, or directly output as an Excel report;
Testeable items
Tensile testing (standard fixture)
Standard flat clip set of 0-10mm,
Other specifications or bar clip options
Compression test (fixture selection)
Bending test (fixture selection)
Peel off test (fixture selection)
Tear test (fixture optional)
Shear test (fixture selection)
Puncture, puncture and other testing items (fixture selection)
Installation environment requirements
Software usage environment: IBM PC compatible machine, PIII or above CPU, 512MB or above memory;
Windows 2000 or Windows XP SP3 or Windows 7 Professional operating system;
The motherboard needs to have a USB 2.0 interface;
Operating environment temperature: 15-30 ℃;
Relative humidity: below 80%;
The distance between the left, right, and rear wall panels of the installation site testing machine and the wall shall not be less than 300mm;
The distance from the front to the wall shall not be less than 1000mm;
Please refer to the structural dimension diagram on the last page: confirm whether the entrance, passage, elevator, etc. can be accessed to avoid affecting the progress of your company's project;
Power supply conditions
Single phase AC220V ± 10%, 500W, 50Hz ± 2%;
The grounding resistance of the protective grounding wire is less than 4 Ω;
Require users to configure corresponding capacity air or power switches for the equipment at the installation site, and this switch should independently control the use of the equipment for optimal performance;
Acceptance criteria and third-party verification
1. Acceptance criteria: Technical indicators shall be in accordance with the methods specified in the "Technical Agreement" signed by both parties or GB/T16491-2008 standard;
2. Acceptance method: Formal acceptance shall be conducted on the site of the purchaser;
3. If the purchaser needs to invite a third party (verified by the National Testing Equipment Quality Inspection Center and issued a valid inspection report) to participate in the acceptance before leaving the factory, the cost shall be borne by the purchaser. If the first acceptance is not qualified, the cost incurred during the second acceptance after improvement by the supplier shall be borne by the supplier;
4. The customer entrusts the National Testing Equipment Quality Inspection Center to conduct calibration on their own;
Recommended products
- 2024-04-12Steam accelerated aging test chamber
- 2024-03-05Hot oil impact test chamber
- 2024-03-05Comprehensive environmental test box for car lights
- 2024-02-22Mars Surface Integrated Environment Module
- 2024-02-22Lunar Surface Integrated Environment Module
- 2024-02-22Space Environment Test Module
- 2024-02-22Acidic Atmosphere Test System
- 2024-02-22Acid salt spray test system


